Switching over to a new computer is a significant upgrade that we all love, and it’s a move that is always welcomed with open arms. However, new computers are an empty slate, meaning you have to transfer all the data from your old PC to your new one. Amongst all the essentials lies your Outlook data which contains your work emails, calendars, and several other crucially important documents that you cannot afford to lose. In this article, we will teach you how to transfer all your Outlook data to your new PC in a secure manner, so read on!
Contents
- Introduction
- Precautions to Follow
- How to Back Up Outlook Data Before Transfer?
- Steps To Back Up Outlook Data Before Transfer
- How to Transfer Outlook Emails to a New Computer?
- Steps to Transfer Outlook Emails to a New Computer
- Alternative Method: How to Transfer Outlook Data to New Computer Using Third-Party Software?
- Steps to Transfer Outlook to New Computer Using Remo Outlook Backup and Migrate
- To Conclude
Introduction
When it comes to possessions that we cannot afford to lose, such as gold, investments, and health, we take extra security measures to ensure their safety. In this case, our priceless possessions happen to be our Outlook data, which consists of all our important emails, schedules, and several other documents that you need to make it through the work week.
By taking all the right steps to transfer your Outlook data to your new PC, you will be able to retain 100% of all your data and will be able to retain 100% of your Outlook data if things go sideways during the migration process. In order to ensure a seamless transaction, there are several things to be done. Let us start by taking necessary precautions on the off chance an error occurs during the transfer
Precautions to Follow
While this is a fairly simple process, and the chances of error are fairly low, we recommend that you take precautionary measures to minimize risk.
- Please ensure that your Windows operating system and your Outlook application have been updated on both your new and old laptop to prevent any complications.
- Do ensure that both systems are plugged into a power socket and that you have a stable internet connection for both devices.
- If you choose to use an external drive, make sure it has enough space to accommodate the Outlook file.
- Read through all the steps mentioned before you begin to follow them.
How to Back Up Outlook Data Before Transfer?
Creating an extra copy of your data will protect you during the event of data loss. While you could store your backup on the same drive, we would recommend using an external storage device or using any cloud storage service. There are several free options out there, such as OneDrive or Google Drive. However, the safest form of data storage will always be the good old-fashioned external storage device, as in addition to serving as a backup; it also protects your data from online threats.
Steps To Back Up Outlook Data Before Transfer
1. Click on File, located on the top-left corner of your Outlook screen.
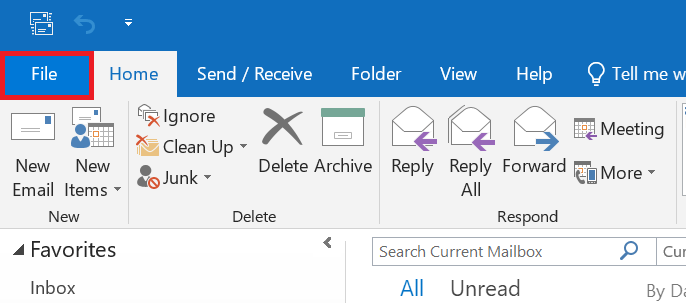
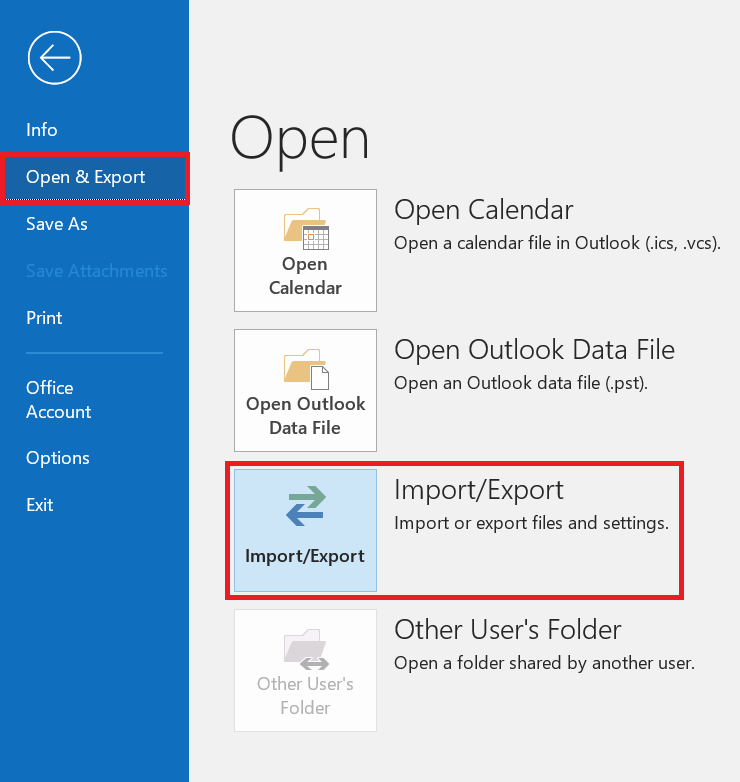
2. Under the Open and Export Tab, Select the Import/Export option.
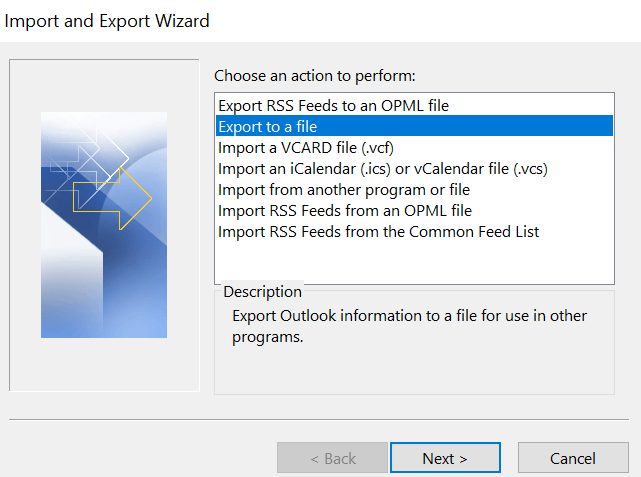
3. Select the Export to a File action and click on Next.
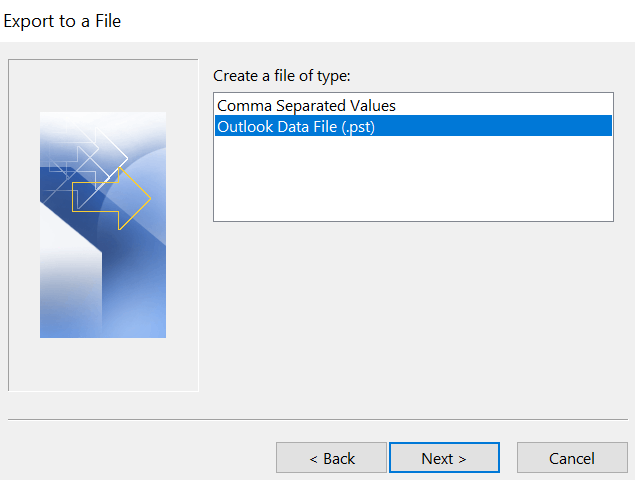
4. Choose to create an Outlook Data File (.pst). By following the instructions that follow, you will be able to select a destination folder and set a name and password for your backup file.
5. After you click on Finish, you should be able to find your backup pst file in the designated location.
Copy the file and transfer it to your new computer using an external storage device or cloud service.
How to Transfer Outlook Emails to a New Computer?
After following creating the backup, let’s proceed to copy the backup files onto your new PC you can use an external storage disk or a cloud storage such as Google Drive. If your Outlook PST file is not that big, you could even email the file to yourself.
Steps to Transfer Outlook Emails to a New Computer
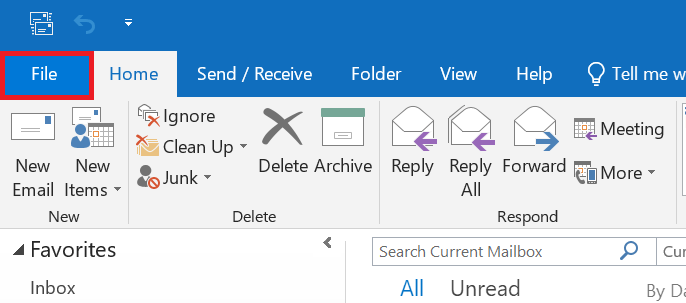
1. Click on File located on the top-left corner of your Outlook screen.
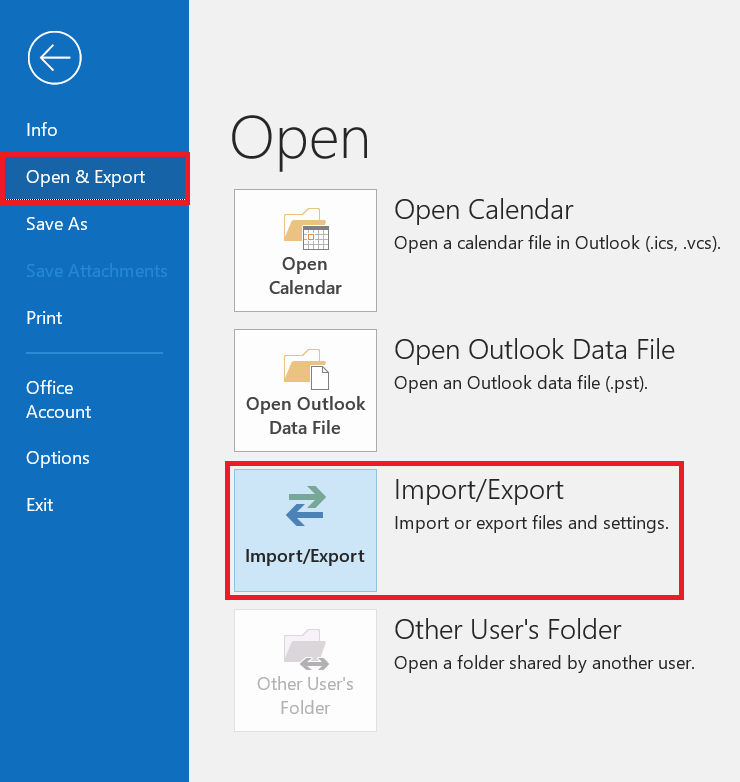
2. Under the Open and Export Tab, Select the Import/Export option.
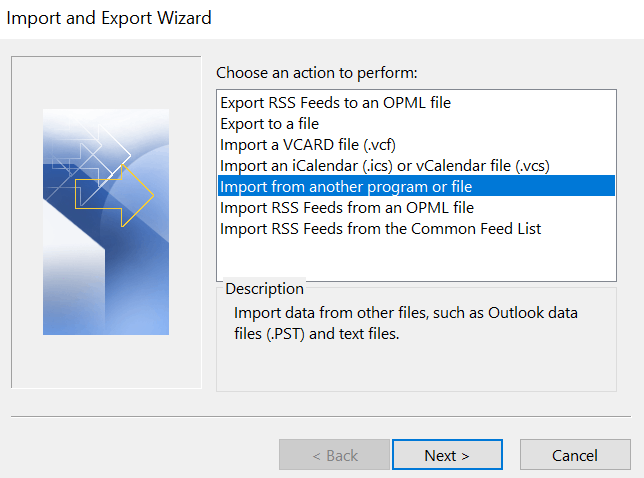
3. Select the Import from another program or file action and click on Next.
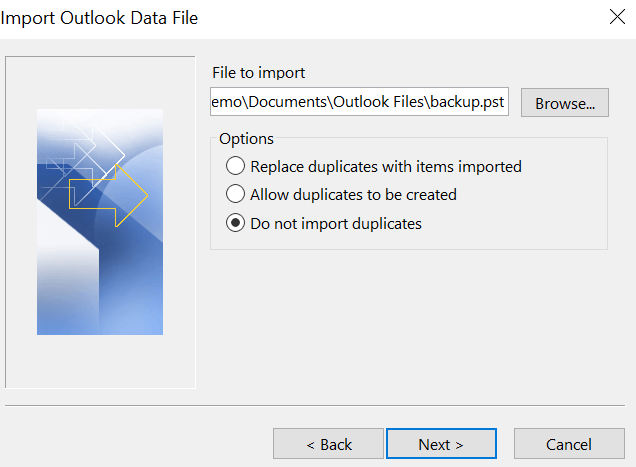
4. Use the Browse option to select your PST file.
5. Select the Do not Import Duplicates Option and click on Next.
6. Click on Finish.
Alternative Method: How to Transfer Outlook Data to New Computer Using Third-Party Software?
If the above method seems too tedious, or you are not as comfortable with technology, you can make use of an Outlook Migration Tool. there is several capable software out there that can easily help you complete the task. For this demonstration, we shall make use of the Outlook Backup and Migrate Tool by Remo as it is one of the most secure and dependable software available in the market today.
Source: Trustpilot
Remo Outlook Backup and Migrate Tool developed by Remo Software is also compatible with Outlook 2019, 2016, 2013, 2010, and 2007. You can get transfer all your Outlook files in a jiffy by downloading Remo Outlook Backup and Migrate and following the instructions below-
Steps to Transfer Outlook to New Computer Using Remo Outlook Backup and Migrate
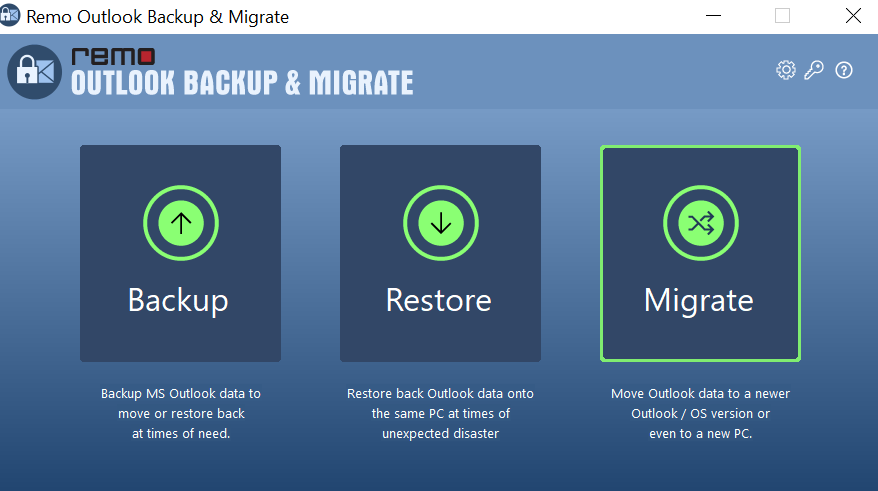
1. Launch Remo Outlook Migration Tool on your New computer and select Migrate.
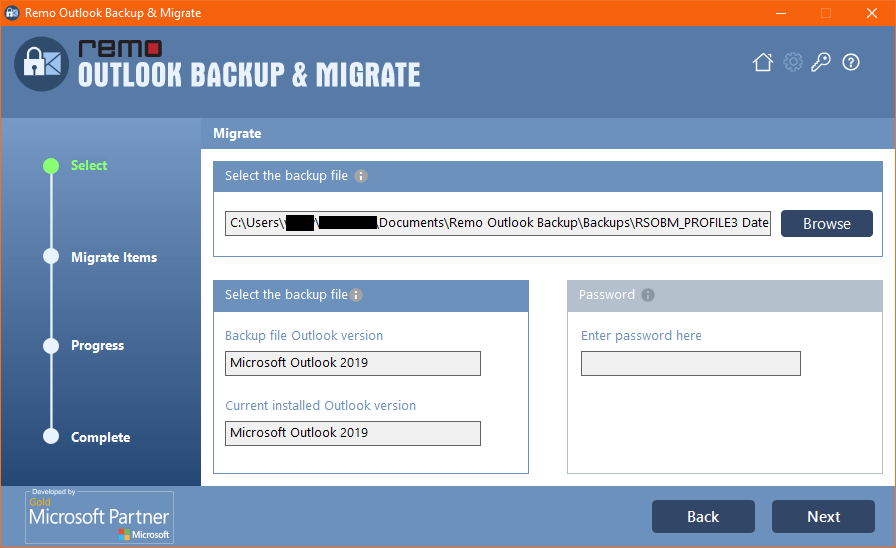
2. Select the file you had taken backup from the Old system and click Next.
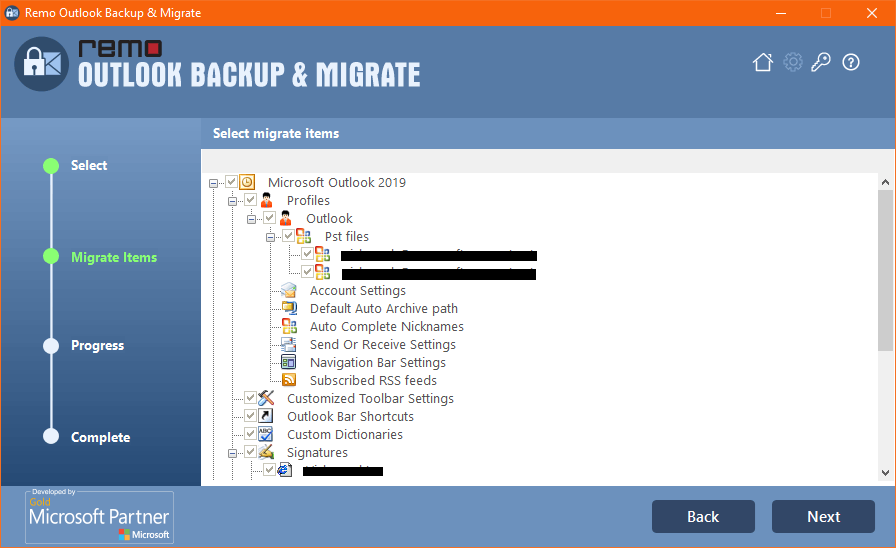
3. Select the files you wish to migrate and click on next.
4. After the Process ends, click on Finish.
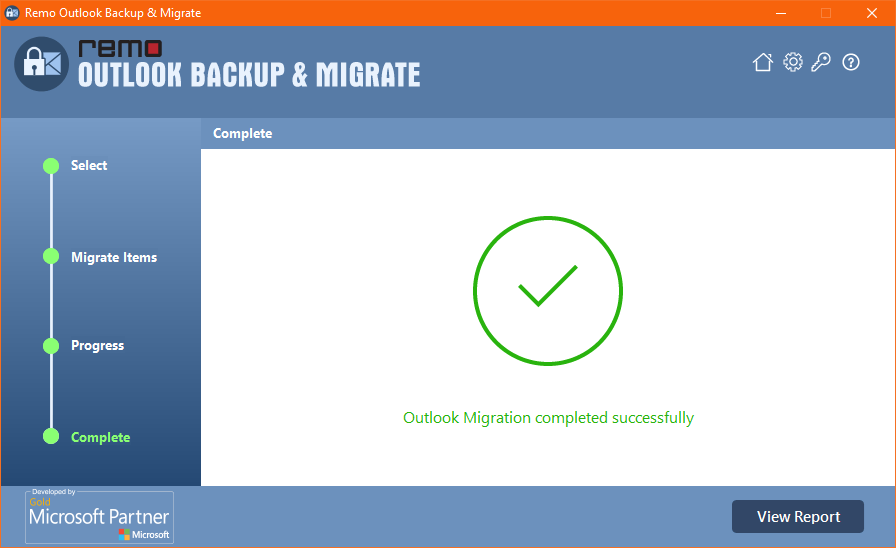
Congratulations, you have successfully transferred all your important Outlook files to your new Windows computer. Do make sure to double-check and ensure that there was no data loss during the transaction.
To Conclude
Outlook is one of the most common email applications used in offices and businesses across the globe. Most employees are highly dependent on Outlook and its role in communication networks across the office. There are countless cases where lost Outlook data proved to be very troublesome, if not critical. Most of these issues have been caused by negligence or system failure. We implore our readers not to skimp out when it comes to precautionary measures, and we hope that this article has been able to help successfully guide you through your Outlook migration process. If you have any other data-related requirements, you can always approach Remo Software, as they offer a wide range of powerful Industry-standard data recovery and data backup tools.


