iPhone has an amazing built-in note-taking app called Notes, where you can save any information, right from your random thoughts to your grocery list. It is also one of the best note-taking apps among users. With the Notes app, you can easily organize notes as folders & sub-folders and collaborate with others. When you accidentally delete an important note, you can easily recover that from the Recently Deleted folder within the Notes app. But remember that any note presented in the Recently Deleted folder will be permanently deleted automatically after 30 days. If the notes are deleted permanently in such a way, you can recover them on your iPhone through different methods.
Contents
- How to Recover Deleted Notes on iPhone in the Notes App
- How to Recover Permanently Deleted Notes on iPhone Using iCloud
- How to Recover Permanently Deleted Notes on iPhone Using iTunes
- How to Recover Permanently Deleted Notes on iPhone Using Mail
- Recover Deleted Notes Using Third-Party Apps
- iMyFone D-Back
- Stellar Recovery
- Wondershare
How to Recover Deleted Notes on iPhone in the Notes App
If you have deleted a note recently, you can recover it from the Recently Deleted folder.
[1] Unlock your iPhone and launch the Notes app.
[2] Navigate to the Recently Deleted folder.
[3] Tap Edit in the top-right corner.
[4] Select the note by tapping the circle you like to recover.
[5] Tap Move (bottom-right).
[6] Choose the folder you like to retrieve the deleted notes.
How to Recover Permanently Deleted Notes on iPhone Using iCloud
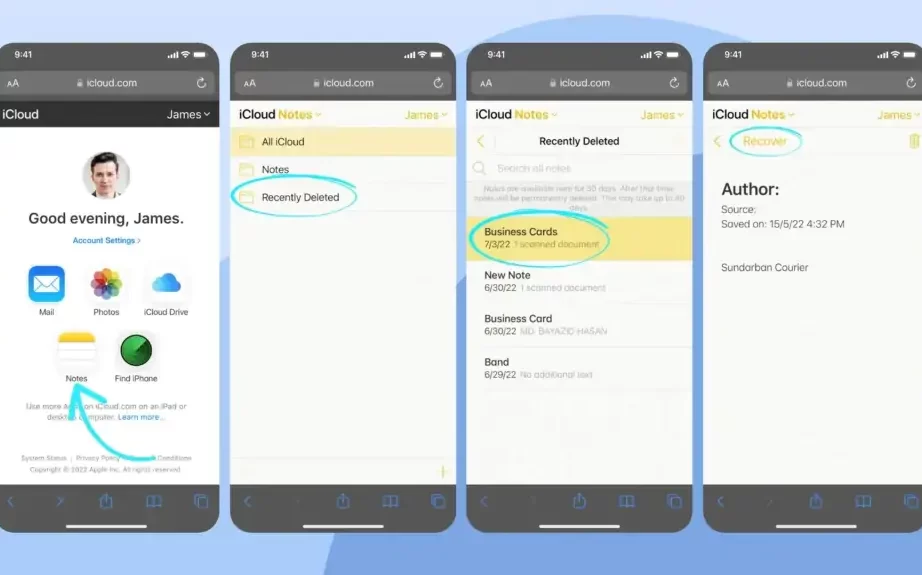
If you have deleted the notes, you can recover them in iCloud within 30 days of selection. Also, remember that you can recover the notes only when you have signed in with Apple ID on the device.
[1] Open the default browser on your iPhone and visit iCloud.
[2] Sign in to iCloud with your Apple ID credentials.
[3] After logging in, go to the Notes app on iCloud.
[4] Tap the Recently Deleted folder from the list.
[5] Select the note you want to recover and tap on it.
[6] Tap Recover, and the notes will be moved automatically to the Notes folder.
Note: If you have deleted a shared note (Not owned by you), it can’t be recovered.

How to Recover Permanently Deleted Notes on iPhone Using iTunes
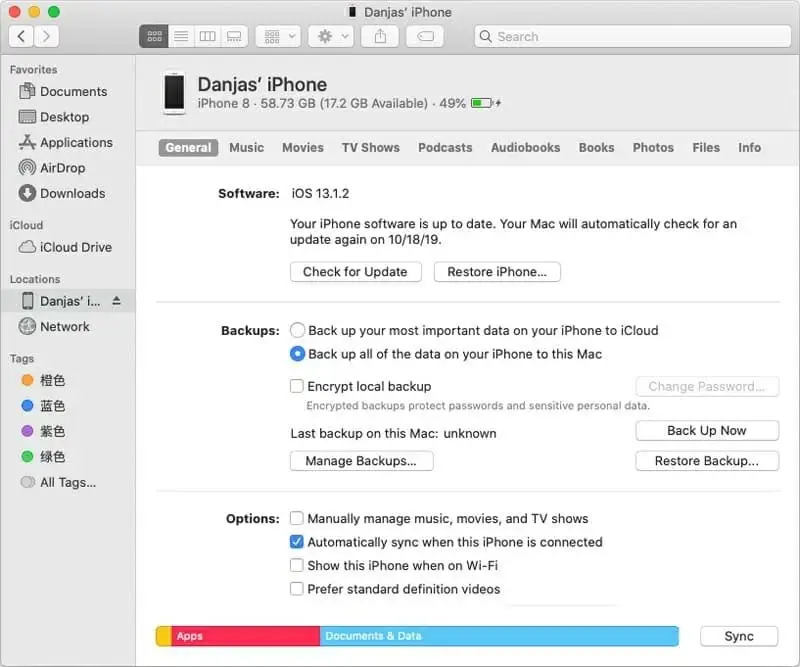
If you are using iTunes, you can also recover your deleted notes using it on your Mac.
[1] First, connect your iPhone to your Mac using a USB cable.
[2] Next, open iTunes on your Mac.
[3] Click the Phone icon in the top-left corner.
[4] Click Summary on the left under Settings.
[5] In the Backups section, click Restore Backup.

[6] Further, click Restore to retrieve your deleted notes back to your iPhone.
[7] Wait for a few minutes for the backup process to finish.
How to Recover Permanently Deleted Notes on iPhone Using Mail
You can recover the notes if you have enabled the Notes app under a Mail account other than Apple, like Gmail, etc.
[1] Go to Settings on your iPhone and tap Mail.
[2] Tap Accounts under the Preferred language.
[3] Tap the desired mail account from the list.
[4] Check if you have enabled the Notes app.
[5] If you have enabled it, launch the mail account and retrieve the deleted notes.
Recover Deleted Notes Using Third-Party Apps
You can also restore your permanently deleted notes on your iPhone with the help of third-party software. We have mentioned some third-party apps that can be utilized to recover the notes.
iMyFone D-Back
iMyFone D-Back is one of the best data recovery apps to recover deleted notes on your iPhone. The software supports recovery from various devices, such as SD Cards, SSDs, Cameras, and more.
Stellar Recovery
With the Stellar Recovery software, you can recover lost data, such as text, contacts, notes, videos, audio, documents, photos, and many more. It is compatible with the latest versions of iOS.
The Wondershare offers multiple ways to recover lost or deleted data on your iPhone. Using Wondershare, you can easily recover it within a few minutes using simple steps.
To proceed with the recovery process, you just need to install this software on your Mac and connect your iPhone using a USB cable. Launch the app and proceed with the on-screen instructions to recover deleted notes on your iPhone.


