Ubuntu is an open-source software operating system suitable for both computer and server use. It is one of the fastest computer operating systems incorporated with various software packages to access. Ubuntu is a highly secured OS based on Linux distribution. It follows a strict development schedule and releases updates frequently. It is necessary to know the exact Ubuntu version you are using, the version number, and the code for applying security patches and fixing the issues. If you are a Linux user, then follow this article to know how to check the Ubuntu version number.
Contents
How to Check Ubuntu Version
It is pretty easy to find out the Ubuntu version by using either the Linux command line or the Graphical Interface method.
Method 1: Steps to Check the Ubuntu Version Using Command Line
(1) On your Ubuntu computer open the Terminal (Ctrl+Alt+T).
(2) Then enter the following command line in the terminal,
lsb_release -a
(3) Instantly it shows the output with Distributor ID, Version Description with a number, and code name.
No LSB modules are available.
Distributor ID:	Ubuntu
Description:	Ubuntu 16.04.4 LTS
Release:	16.04
Codename:	xenial
Alternative Command lines to Check Ubuntu Version
(1) Use the Command Lines below to check Ubuntu Version
#1: Open the Terminal and enter the following command line.
cat /etc/issue
#2: On the next screen, it will show the output with the Ubuntu Version number.
Ubuntu 16.04.4 LTS \n \l
(2) Besides the above methods, you can also use the below-stated command line to check your Ubuntu version.
#1: Open the Terminal on your Ubuntu device and then enter the command as
cat /etc/lsb-release
#2: It will show the output with the Distributor ID, the Code name, and the current version number.
DISTRIB_ID=Ubuntu
DISTRIB_RELEASE=16.04
DISTRIB_CODENAME=xenial
DISTRIB_DESCRIPTION="Ubuntu 16.04.4 LTS"
(3) Find Out the Ubuntu Version using the Neofetch Command
By using the Neofetch command, you will come to know all the system information along with the Ubuntu version number and code. To run the Neofetch command, you need to install Neofetch on your Ubuntu system.
#1: Open the Terminal and enter the following command to install Neofetch on your Ubuntu device.
sudo apt install neofetch
#2: After installation, run the Neofetch command in the new Terminal window.
neofetch
#3: It will display the information about the Linux kernel version, Ubuntu version, the desktop environment in use along with its version, themes and icons.
(4) Find Out System Information using hostnamectl Command
This command is mainly used to set the system hostname. In addition to this, you can use it to check Ubuntu Version using the terminal.
Run hostnamectl command in the terminal, and you will get the output as displayed below.
Static hostname: linuxize
         Icon name: computer-vm
           Chassis: vm
        Machine ID: f1ce51f447c84509a86afc3ccf17fa24
           Boot ID: 2b3cd5003e064382a754b1680991040d
    Virtualization: kvm
  Operating System: Ubuntu 18.04 LTS
            Kernel: Linux 4.15.0-22-generic
      Architecture: x86-64
Method 2: Check Ubuntu Version using the Graphical Interface
Finding out the Ubuntu version using the Graphical Interface is pretty simple and easy. You no need to type any command line, check the Ubuntu version just from the system settings.
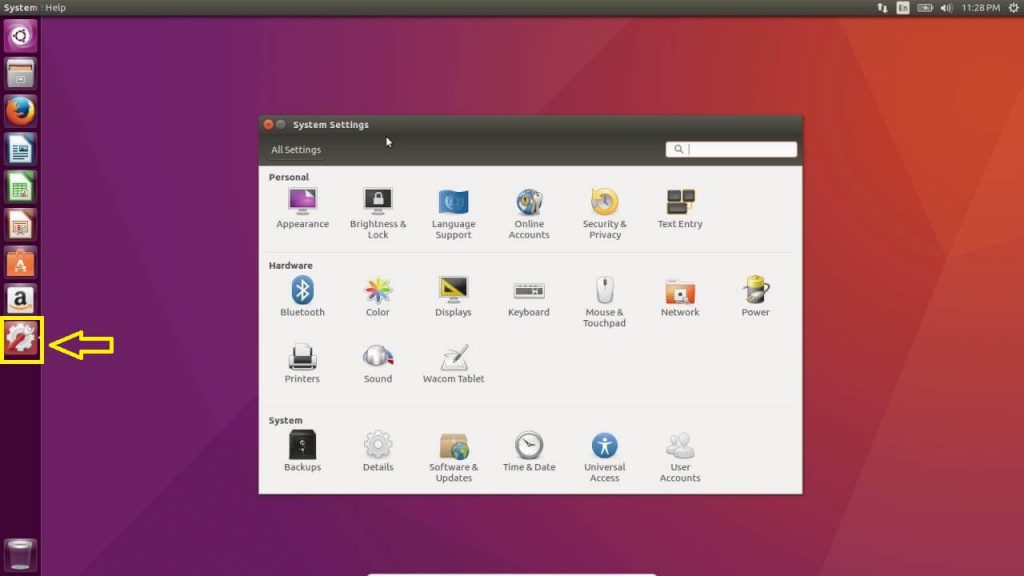
(1) Open the System Settings app on your Ubuntu PC.

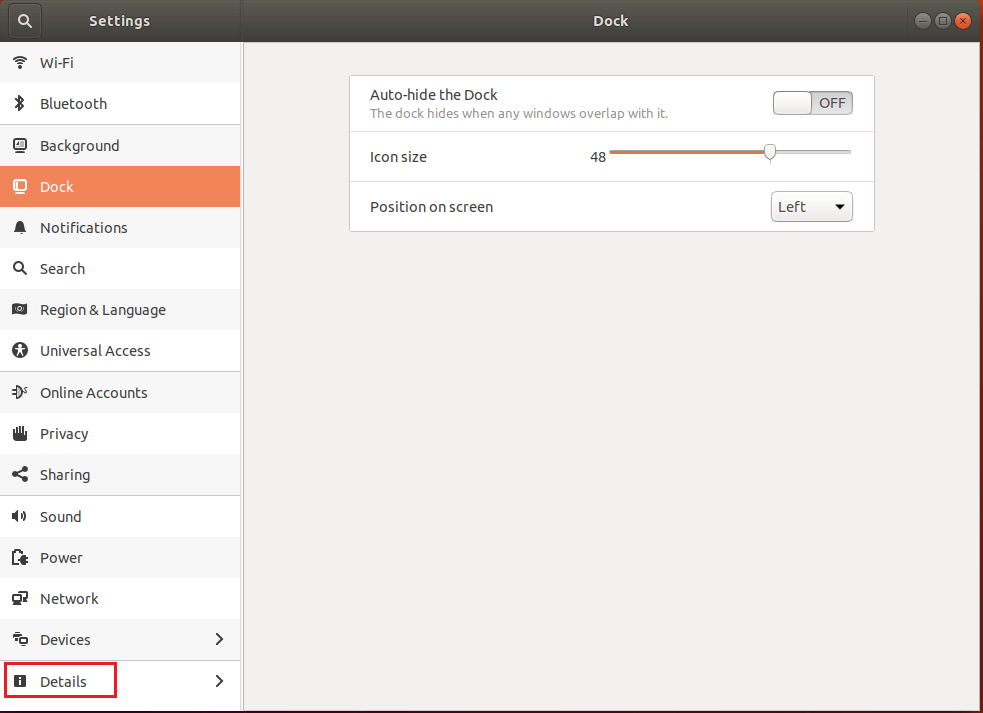
(2) Select the Details option.

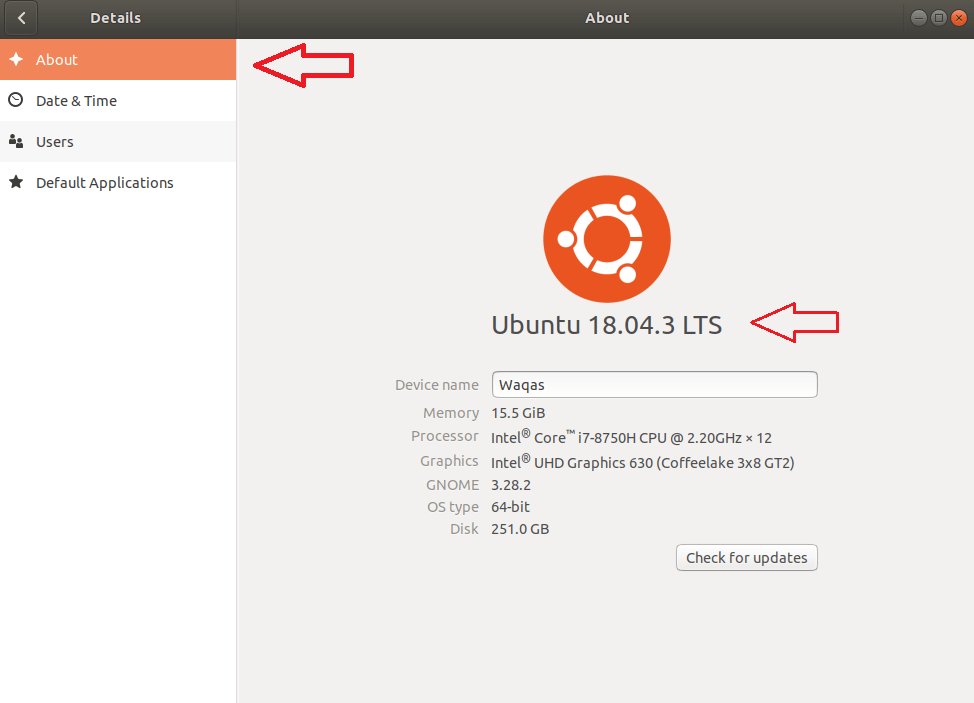
(3) Then select About option, the about page will be displayed with all the Ubuntu information including, Device name, storage, processor, OS type, Graphics, Gnome, and Visualization.

(4) Select Check for Updates button to know whether there are any updates available or not.
If you are a Windows user, then learn How to Check Windows Version.
Our Opinion
The above details are the essential information to explore your Ubuntu Version and other details. In case of experiencing any struggles, you should check Ubuntu version and must update them, if available.
If you have any other method to find the Ubuntu version, mention it in the comment section below. Visit our Facebook and Twitter page for more tech updates.


